Apple Tart - Gluten and Lactose Free

Sunday 26 June 2016


Gluten free, lactose free Apple Tart
Freshly Baked Apple Tart brushed with Maple Syrup


Gluten free, lactose free Apple Tart raw
Apple Tart ready to go into the oven


Gluten free, lactose free Apple Tart baking
Baking away - hurry up looks so good

Gluten free, lactose free Apple Tart easy recipe
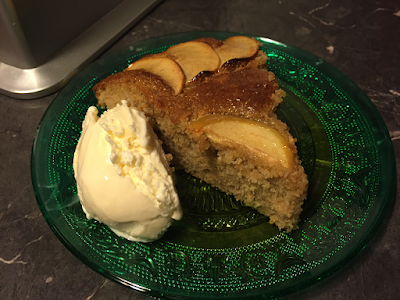
Risen beautiful, soft, light and fluffy and with a scoop of lactose free ice-cream

Gluten free, lactose free Apple Tart with lactose free ice cream
Gluten Free, Lactose Free Apple Tart


I found this delicious gluten free and lactose free Apple Tart recipe in the weekend magazine of the Sunday paper. It's actually a Donna Hay recipe that I altered.

I have yet to find a Donna Hay recipe that I can make exactly as written. She is also the only person who uses pouring cream instead of milk in almost all her recipes which is extremely annoying and frustrating. Ok enough complaining on to my delicious recipe.

I made quite a few changes basically depending on what I had in the pantry. The only thing I had to buy was the gluten free plain flour which was half price so that made me happy.

I also used cashew meal because its cheaper than almond meal and has a mild flavour which I prefer. It also tastes a lot better I think than almond meal as well. In future I am going to use this instead. I made a few more changes but won't bore you with that.

So without further ado I give you the recipe to an incredibly delicious and easy to make gluten free and lactose free Apple Tart.

Apple Tart - Gluten free and lactose free

Ingredients
130gm milk free margarine
1/2 cup brown caster sugar
1 teaspoon vanilla essence
1 tablespoon finely grated lemon rind
1 tablespoon finely grated orange rind
3 eggs
1 1/2 cups cashew meal
1/2 cup gluten free plain flour
1/2 teaspoon gluten free baking powder
1 apple finely sliced
2 tablespoons maple syrup

Method
Preheat oven to 160C/320F. Lightly grease a 26cm fluted loose-based tart tin.

Place the margarine, sugar, vanilla, lemon and orange rind in an electric mixer and beat for 5 minutes or until light and fluffy.

Add eggs one at a time beating well after each addition. Add the cashew meal, flour and baking powder and mix to combine. 

Spoon the mixture into the tart tin and smooth. Press the slices gently into the filling.

Place the tart on a baking tray and cook for 40-45 minutes or until golden. Remove from oven and while hot brush with maple syrup.


Easy Flapper Pie Recipe

Monday 13 June 2016


Freshly Baked Flapper Pie

Hazelnut Meal Crust


Delicious vanilla custard filling
 
Light and fluffy meringue topping


The finished product - Flapper Pie

A slice of fluffy heaven

Easy Gluten Free and Lactose Free Flapper Pie

I found out about Flapper Pie which I had never heard of before from a friend on Facebook - as youe do. He posted a list of pies and this was on it. The minute I saw Flapper Pie I knew I had to make it.

Of course the original has a biscuit base but since I don't eat wheat I found the almond meal variation. You could also use gluten free biscuits to make a gluten free biscuit base if you don't want to use a nut meal. Might try that next time. Also since I am lactose intolerant I used lactose free milk.

I found this pie very easy on my stomach. It is very light and easy to digest so a few slices will go down a treat!

I did find it a bit bland though. It didn't help that I forgot to sprinkle some almond meal on top to add some crunch which it does need for that extra texture.

Don't let the three layers scare you, it is so easy to make. Just take it a step at a time, put it together as instructed and you will have a lovely Flapper Pie in no time.

Original recipe from The Kitchen Magpie


Easy Gluten Free, Lactose Free Flapper Pie


Crust
1 ½ cups nut meal (I used hazelnut meal but you can use almond)
¼ cup melted coconut oil
dash of cinnamon

Filling
2½ cups lactose free milk
½ cup of white sugar
¼ cup of gluten free corn starch
3 egg yolks
1 tsp vanilla
pinch of salt

Meringue Topping
3 egg whites
¼ cup of sugar
¼ tsp of cream of tartar

Topping
2 tsps almond meal

1. Mix all the crust ingredients together and press all around and up the sides of a 25cm/10 inch pie dish. Bake at 180C/350F for 10 minutes.

2. Combine all the ingredients for the filling and mix together. Cook on a medium heat until it boils and thickens, making sure to stir constantly (this is the secret)! Set aside to cool while you make the meringue. (Note this will get a skin on it unless you place a layer of baking paper on top).

3. Beat the meringue ingredients together until they form stiff peaks.

4. Pour the filling into the crust and top with the meringue. Make little peaks with a fork which will brown when baked. Sprinkle the almond meal on the top then bake in a 180C/350F degree oven until the meringue browns, around 10 minutes. Keep an eye on it though so it doesn't burn.

5. Cool in the fridge and eat the same day.

Note: This pie does not last long as the meringue on top gets gooey and the nut meal crust gets moist and gets soggy so eat the same day or next day. It won't last longer than that.
Related Posts Plugin for WordPress, Blogger...

Sia's Cooking Blog Designed by Ipietoon Blogger Template