Paleo Vanilla Cake with Chocolate Icing

Wednesday 27 March 2013


Dairy Free Vanilla Cake

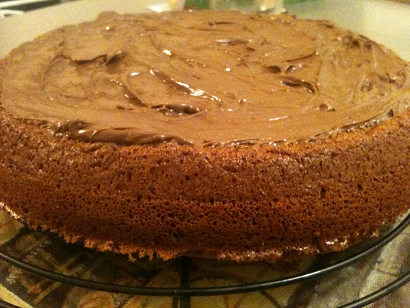
This is a delightfully soft and fluffy paleo vanilla cake that is dairy free, wheat free and gluten free. Whipping the egg whites will give you that every time.

Gluten Free Vanilla Cake
 
The chocolate frosting for the vanilla cake is made with milk free chocolate which you can easily get from the health food section of your local supermarket and coconut oil.
 
Paleo Vanilla Cake with Chocolate Frosting
 
 Bird's eye view. Yum! 

Vanilla Cake Recipe

I really love folding the egg whites through the meals and seeing how glossy all the ingredients get and how light they are. It makes my heart sing. I find it exciting. Maybe it's just me.

If I make this again which I will, then the  recipe will get altered. I think fewer eggs, and less coconut oil and honey will be used. And there is too much coconut oil in the chocolate frosting. That much really wasn't needed.

The pecans have a lot of oil so I will either use the almond meal or hazelnut meal as I first had intended but then saw I had a small bag of pecans in my pantry so I just used that. Anyway that's just me thinking aloud.

I made this cake for Easter so added some chocolate eggs and a bunny in the centre. These are not milk free. If you want this cake totally dairy free then get some dairy free chocolate eggs and break them up and decorate your cake that way.

I got some ribbon and wrapped it around the cake and fastened it with a sewing pin.

Paleo Vanilla Easter Cake with Dairy Free Icing


Paleo Vanilla Cake Recipe with Chocolate Icing

Cake Ingredients
½ cup almond meal
½ cup pecan meal
½ teaspoon salt
1 teaspoon baking soda
5 eggs room temperature
½ cup coconut oil
½ cup honey
1 tablespoon vanilla extract

Chocolate Icing Ingredients
1 cup (150gm) dairy free chocolate or dark chocolate
¼ cup coconut oil
1/2 teaspoon vanilla extract


Cake Method
1.   Preheat the oven to 165C
2.   Prepare a 25 cm round spring form tin cake pan lined with baking paper.
3.   Separate the egg yolks and whites.
4.   Beat the egg whites to stiff peaks and set aside.
5.   Combine the honey, baking soda, coconut oil and vanilla.
6.   Add egg yolks one at a time.
7.   Mix in almond and hazelnut meals.
8.   GENTLY fold the whipped egg whites in thirds slowly into the yolk mixture.
9.   Bake for about 25-30 minutes on centre shelf (really important) in oven until centre is cooked and toothpick inserted in centre comes out clean.
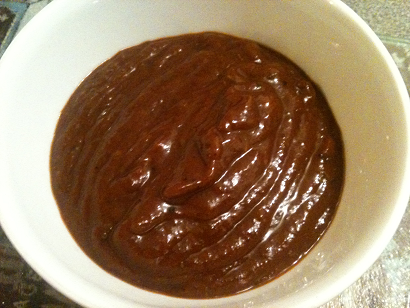
Frosting Method
1. In a microwave safe bowl melt chocolate for 1 minute then stir until melted.
2. Add coconut oil and mix until combined.
2. Place frosting in freezer for 15 minutes to chill and thicken.
3. Remove from freezer and whip until it is thick and fluffy.
4. Frost over cake and decorate.

Chocolate Icing adapted from Elana's Pantry.


Cauliflower Pizza Crust - Wheat Free, Gluten Free


I heard about the cauliflower pizza crust when I started on my wheat free diet. I dismissed it because it had cheese in it but since I have been on this diet I find that I can eat a bit of cheese with no problems.

The aromas that came out of the oven just make you salivate. The oregano, onion and garlic salt work incredibly well together and make this an incredibly delicious cauliflower pizza crust.

All I can say is you just have to try it.


Cauliflower Pizza Crust

Ingredients
2 cups shredded cauliflower (1/2 head of cauliflower)
1 egg
1/2 cup tasty cheese
1 teaspoon dried oregano
1/2 teaspoon dried garlic
1/2 teaspoon onion salt
salt and pepper to taste

Method
Rice the cauliflower with a box grater or in a food processor.

Place in a microwave safe dish, cover with cling film and microwave for 8-10 minutes or until cooked.

Immediately add all other ingredients and stir until cheese is melted and all ingredients have combined.

Preheat the oven to 200C.

Line a pizza tray with baking paper spray with olive oil spray then place mixture onto tray and form a 20cm circle - that is the size I got anyway.

Bake crust until lightly golden brown, about 15-20 minutes.

Then add your usual ingredients. Let me know how you go. Did you like it? Will you try it again?
 

Traditional Vinaigrette Dressing

Tuesday 26 March 2013


Easy Traditional Vinaigrette Dressing

This is a very easy vinaigrette dressing to make. If you don't have time to whisk it, place all the ingredients in a screw top jar and just give it a good shake.


Vinaigrette Recipe

Ingredients
2 tablespoons apple cider vinegar
pinch of salt
1 teaspoon Dijon mustard
freshly ground black pepper
1/3 cup plus 1 tablespoon extra virgin olive oil

Method
Place 2 tablespoons vinegar into a bowl and add a pinch of salt and Dijon mustard.

Whisk lightly until the mustard breaks down.

Season with lots of black pepper. Add the oil whisking continuously.


Note: Instead of vinegar you can use any other citric juice, white wine vinegar or balsamic vinegar. Any type of oil can be used so get creative.

If you are busy or just lazy (like me!) place all ingredients in a screw top jar and give it a good shake. Results will be similar to whisking but not the same.

Three Ingredient Chocolate Coated Peanut Butter Snails

   
Chocolated Coated Peanut Butter Snail Cookies

These divine little Chocolate coated peanut butter cookies are even more delicious than they look.  Better then that they only have three ingredients in them. 

These easy flourless peanut butter cookies are dairy free, wheat free, gluten free and sooo good to eat.

They are tiny bite size pieces and so easy to eat too many in one go. Fun and delicious. Cooking and eating has never been so good.


Chocolate Coated Peanut Butter Snail Cookies - Dairy Free, Wheat Free, Gluten Free


Chocolate Coated Peanut Butter Snails

Ingredients
1 cup homemade peanut butter
1/4 cup honey
1 egg

Chocolate Coating
100gm dark chocolate

Method
Preheat oven to 180C.

Combine the peanut butter, honey and egg in a medium size bowl.

I used my 1/2 teaspoon to make the small snail shapes. If you would like larger biscuits use your 1 teaspoon.

Bake for 7-8 minutes until golden brown.

Allow to cool on wire rack.

Chocolate Coating
Melt chocolate in a microwave safe bowl and zap for 1 minute. Stir, zap again for 1 minute then dip tops of peanut butter biscuits in chocolate and allow to set.


Chocolate Tart

Sunday 24 March 2013


How divine is this gluten free and grain free, Paleo Chocolate Tart! And guess what it is mind blowingly delicious.

To make it vegan just change the honey to maple syrup. It will be equally as delicious.


The flavours in this tart are so wholesome especially the honey and cinnamon. You will never get flavours like this in a store bought tart. You really must make this for yourself then you will never go back. This Chocolate Tart will become a family favourite.


Chocolate Tart

So glossy, smooth, sweet and delicious.


Chocolate Tart

Chocolate Tart

Crust
1 3/4 cups almond meal
1/4 cup coconut oil
1 tablespoon honey
1/4 teaspoon salt
1/4 teaspoon cinnamon

Filling
300ml coconut milk (1 can)
400gm dark chocolate (I used two blocks of Nestle Plaistowe Dark Chocolate)


To Make Crust:
I grind my own almonds and if you do too take 1 1/2 cups of almonds put them through your food processor then place almond meal into a medium sized bowl, add all other ingredients and mix until well combined.

Grease a 22cm/9 inch tart pan. Then press the almond meal into the bottom of the pan. Prick holes all over base with a fork to prevent it from rising.


Chocolate Tart Almond Meal Crust

Turn oven on to 180C and place pie crust in oven. I placed the tart pan on a baking tray. Makes it easier to move around.

Baking with almond meal can be tricky as it does burn quickly. The crust on this tart burns very quickly.  

Here is the secret to getting the perfect crust:  Place foil around the edges of the crust then place in the middle of the oven for 15-20 minutes or until crust is lightly browned and cooked through. Keep an eye on it at all times!

Set aside and allow to cool completely.

To Make Filling
Break up chocolate and place in a medium sized bowl. Heat coconut milk in a small saucepan until just boiling and pour over chocolate. Stir until all chocolate is melted. Then pour chocolate mixture into pie crust.

Place chocolate tart in fridge until set.

You can decorate your tart with anything you like including chocolate curls, different types of nuts, cocoa powder, strawberries..... I was in a hurry, as I made this for a farewell dinner for a friend, and didn't have time but would have scraped a few chocolate curls from the rest of the chocolate block I had left over. 


How to Make Peanut Butter

Wednesday 20 March 2013


So you want to learn how to make peanut butter. Well lucky for all of us it is very simple. All you need are peanuts and a food processor!

The power of your food processor will dictate how long it takes to make your peanut butter.  This was my first time and I used about 1/3 cup of peanuts as a trial and it took about 5 minutes.

I used lightly salted, roasted peanuts and really they are the best nuts to use. What I noticed is you can really taste the roasted flavour of the nuts which you can never taste with the peanut butter you buy from the store. It is a delicious flavour.

Below is a step by step breakdown of how the nuts
 

How to Make Peanut Butter


Step 1
Add peanuts to processor. Very easy step.


Step 2.
Start pulsing. After a minute it will got to a bread crumb like stage.
I had to scrape down the sides as the blade was spinning but not doing anything.


Step 3.
After a minute the oils will start to release from the nuts and you will
get this consistency.  Keep going almost there.


Step 4.
 
Success!
The oils from the nuts have been released and you have peanut butter.
Yummy.


In the processor the peanut butter will be runny because of the heat from running the blade but once you put it in the fridge it will thicken up a bit and you will have delicious roasted peanut butter. YUM!
 
Storing Peanut Butter: I placed my peanut butter in a small glass jar I have and put it in the fridge. It will keep about a month in the fridge and possibly a few weeks out if you decide to store it in your pantry. Remember there are no preservatives so won't last long outside the fridge.
 
So now you know how to make peanut butter. So get to it! No more excuses that it is too hard. It is actually too easy!
 

Fudgy Date Chocolate Cake - Dairy Free, Wheat Free, Gluten Free

Tuesday 19 March 2013


When I saw this Chocolate Cake recipe I thought no way is it going to work. I was so intrigued that I had to try it.

Of course I changed it around as I didn't have all the ingredients and am not a big fan of coconut flour. It has a grainy texture which I don't really like but coconut flour does have many health benefits so thought I would include some of it. You can use either coconut flour or almond or just go half/half like I have. 

The ingredients are very healthy and minimal but they do make a delicious cake. I have avoided making cakes with strange ingredients like dates or beetroot or avocado but though it time to try as I am only new to the wheat free diet.

I was pleasantly surprised as it is delicious. You might think it's raw when sliced but that is its consistency it is just fudgy so fear not.

This is a quick, simple, easy recipe. I recommend you try it.  Let me know how you go.


Fudgy Date Chocolate Cake

Ingredients
4 Midjool dates
½ cup water
2 tablespoons almond flour
2 tablespoons coconut flour
3 tablespoons cocoa
2 tablespoons honey
3 tablespoons coconut oil
2 eggs
1 tsp vanilla extract

Method

Cut the dates into small pieces, cover with 1/2 cup of water and place in microwave for 2 minutes. Let them soak, soften and cool.

Preheat oven then grease and line a small cake tin. I used a loaf pan 25cm by 14cm end to end. Sounds large but is actually small.

Mix all the ingredients together in a food processor then pour into tin.

Bake for 30-40 minutes at 180C.

Cool on a wire rack then slice and serve.

Adapted from Fitness Treats

Oven Cooked Pork Ribs with Homemade Barbecue Sauce

Monday 18 March 2013

Oven Cooked Pork Ribs


I wanted to find out how to cook pork ribs and found this great oven cooked pork ribs recipe which I have changed as I always do. 

I have never baked pork ribs before but found the recipe incredibly easy. This recipe also makes incredibly succulent pork ribs. They just melt in your mouth. You won't be able to stop at one and neither will you want to.


Oven Cooked Pork Ribs with Homemade Barbecue Sauce

Ingredients
1 cup Homemade Barbecue Sauce
1 kg pork ribs

Method
Place pork ribs in a large shallow dish and coat with homemade barbecue sauce. Cover and place in fridge. Let ribs sit overnight in the fridge if possible to really absorb all the flavours.

Preheat oven to 180°C. Line a large baking dish with foil. Transfer ribs to dish and cover. Reserve marinade to coat pork ribs during cooking process.

Bake ribs for 1 hour 30 minutes, basting with reserved marinade turning every 30 minutes.

The last 30 minutes take off foil and bake uncovered. Remove from oven and serve warm.


Sia's Homemade Barbecue Sauce

Sia's Homemade Barbecue Sauce


This delicious homemade barbecue sauce recipe came from about.com and is called the Memphis Barbecue Sauce. I changed it a bit and will change it again as I want to try and make it as paleo as possible. Next time I make it I am going to use tomato paste and remove the sugar.

It is a thick, smooth, sweet and tangy sauce that is great on pork ribs slow roasted in the oven.

I have split it up into two sections as it is easier to read without forgetting ingredients (ooops!).

It is not a sugar free barbecue sauce but you can make it sugar free by using tomato paste, tomato sauce has a lot of sugar,  and taking out the brown sugar.

If you choose you can also remove the molasses but then it will be a bit more savoury.  I think still good. Let me know how you go if you remove all the sugar. 

Sia's Homemade Barbecue Sauce Recipe

Wet Ingredients
3/4 cup apple cider vinegar
1 cup tomato sauce
1/2 cup water
2 tablespoons Dijon mustard
2 tablespoons molasses
1/4 cup finely chopped onion
2 tablespoons minced garlic
2 tablespoons olive oil

Dry Ingredients
2 tablespoon brown sugar
1 tablespoon paprika
1/4 teaspoon dried chili flakes
2 teaspoons dried oregano
2 teaspoons dried thyme
1 teaspoon salt
1 teaspoon black pepper


Method:
Combine apple cider, tomato sauce, water, mustard and molasses in a bowl until well combined.

In a separate bowl mix all dry ingredients until well combined.

Heat olive oil in saucepan over medium heat then add onion and garlic and saute until lightly browned about 5 minutes.

Add wet ingredients to the saucepan then stir in the dry ingredtinets. Stir until all mixed together.

Reduce heat and simmer on low for 20 minutes. Allow to cool.

If you would like a smoother barbecue sauce which I do then puree with a mixer.

Store in a glass jar in fridge. Should last a good month.

Cinnamon Coconut Flour Pancakes - Dairy Free, Wheat Free, Gluten Free

Saturday 16 March 2013


Cinnamon Coconut Flour Paleo Pancakes

The recipe for these light and fluffy coconut flour pancakes came from Paleo Spirit. I changed it a bit as I always do to suit what I have at home at the time.

They are really light on the tummy and moist and delicious

Not much more to say than enjoy!


Fluffy Cinnamon Coconut Flour Paleo Pancakes

Cinnamon Coconut Flour Pancakes

Makes 6 small - medium sized pancakes

Ingredients
2 eggs
1/2 cup rice milk or any nut milk
1 teaspoon vanilla extract
1/4 teaspoon liquid stevia or to taste
1/4 cup coconut flour
1/2 teaspoon baking soda
1/4 teaspoon cinnamon
 pinch of salt


Method
Beat eggs with a mixer until frothy. Mix in milk, vanilla, and stevia.

In another bowl combine coconut flour, baking soda, salt and cinnamon.

Combine dry mixture with wet and beat until well combined.
 
Preheat fry pan and spray with olive oil then pour in batter to create pancakes.

Cook for approximately 2-3 minutes each side.

Serve hot with pure maple syrup or topping of choice.

Chocolate Peanut Butter Slice - Dairy Free, Wheat Free, Gluten Free

Friday 15 March 2013

Chocolate Peanut Butter Slice
 
I found this delicious recipe at Detoxinista but changed it just a little. I used less honey. Even though it has wonderful properties in it honey does make your blood sugar sky rocket and really isn't all that good for you. Plus honey is just another sugar in a different form. So less is best.

I added some vanilla extract just because I love the vanilla taste with chocolate. I also used a mix of dark chocolate, I had Lindt 82% chocolate and dairy free milk chocolate which is delicious just because I had a bit of both. I think this gives it that extra dimension in flavour so I think it worked well.

This slice is also very light on the belly but I wouldn't be hoeing into it as it does have a few calories.


Unfortunately I burnt mine (see pic above) even though I cooked it for the recommended time so have altered it to 15-20 minutes.

Cook until golden brown. When you touch it in the middle it will seem raw but it settles and sets. So take it out at this stage. You don't want it firm to the touch otherwise it is probably burnt and overcooked like mine. Then you find the best pieces are in the middle hence the reason the middle pieces got eaten first!

Chocolate Peanut Butter Slice

Makes 16 pieces

Ingredients
1 cup natural creamy peanut butter
1/4 cup honey
1 egg
1/2 teaspoon vanilla extract
1/2 teaspoon baking soda
1/2 cup chocolate chips (I used a mix of dark and dairy free milk chocolate)
pinch of salt

Method
Preheat oven to 180C/350F and grease a 20cm/8inch square pan with olive or coconut oil.

In a small bowl, mix the peanut butter, honey, egg, salt and baking soda until well combined, then fold in the chocolate chips.

Pour the batter into the greased pan, and use a spatula to smooth the top.

Bake for 15-20 minutes, or until the top is a light golden brown.

Let cool, then cut into squares and serve!

Chocolate Iced Pecan & Oat Baked Donuts - Dairy Free, Wheat Free, Gluten Free

Tuesday 12 March 2013


Chocolated Iced Pecan & Oat Baked Donut Recipe

The original baked donut recipe for these divine donuts came from Never Home Maker. It is a great baked donut recipe. I removed the cocoa and the egg replacer and used my own chocolate icing recipe.

They are incredibly tasty, moist and delicious and the chocolate icing is to die for.

The dairy free chocolate I discovered it soooooooooooo good. It's hard not to eat the whole thing every time I get it.

Chocolate Iced Pecan & Oat Baked Donuts Recipe

Pecan and Oat Baked Donut Recipe

Ingredients
1 cup quick oats, processed into flour
1/4 cup pecans (processed with oats)
1/4 cup maple syrup
1 teaspoon baking powder
1/2 teaspoon baking soda
1/2 cup rice milk or any milk
1 teaspoon vanilla extract
1 egg
pinch salt

Chocolate Icing
1/4 cup dark chocolate
1/4 cup dairy free milk chocolate
2 tablespoons coconut oil

Method for Donuts
Preheat to 180C/350 degrees F.

Lightly grease a 12 hole donut pan.

Put all ingredients in a bowl and mix well. The batter is a bit runny but it makes moist donuts. Do not be tempted to add another egg. The recipe doesn't need it.

Pour into donut tin.

Bake for 12 to 14 minutes, until slightly firm. I baked mine for 13 minutes and they were perfect!

Let cool in pan and then gently remove. I had to pry mine out with a spoon. I didn't use a lot of grease so they got a bit stuck. Next time I will grease the tin a bit better.

Method for Chocolate Icing
Melt all ingredients in a bowl sitting over a saucepan of boiling water. Dunk donuts in icing and allow to cool. If you are inpatient like me and you dunk them while they are still warm you will find they are fragile and will break up in the icing. 

Notes:
Wait for donuts to go cold then dunk them in icing. Otherwise use a spoon or knife and ice that way. Either way they are incredibly tasty, moist and delicious.

With the chocolate I had a bit of dark chocolate left over so used half and half but you can use all dark chocolate or all milk chocolate.


One Minute Peanut Butter Cake - Dairy Free, Wheat Free, Gluten Free

Wednesday 6 March 2013


One Minute Peanut Butter Cake with Chocolate Peanut Butter Icing


One Minute Peanut Butter Cake
One Minute Peanut Butter Cake with Chocolate Shavings


I love this recipe I found at Back to Her Roots. I love peanut butter so had to make it. This is quick, easy and delicious. And the Chocolate Peanut Butter Icing is to die for!

I changed it around because originally it had sugar and flour but substituted it for almond meal and liquid stevia.

Originally this recipe said to zap for 30 seconds in the microwave but it looked raw to me so I zapped it for 1 minute. I think maybe 50 seconds would have been better but it still came out moist and delicious but a bit firm. Will definitely be making this again though.

One Minute Peanut Butter Cake

Ingredients
1 egg, beaten
1/8 teaspoon liquid stevia or more to taste
1/2 teaspoon baking powder
1 heaped tablespoon almond meal
2 tablespoons peanut butter


Method
1. In a small bowl, whisk together all ingredients.

2. Pour batter into a greased ramekin. Microwave for 50 seconds.

3. Grate some dark chocolate on top and enjoy.


Macadamia Fudge - Dairy Free, Wheat Free, Gluten Free

Tuesday 5 March 2013


Macadamia Fudge Recipe

I love the Detoxinista she has some great recipes and that is where I got this Macadamia Fudge recipe from. I changed the recipe a little as I always do.

It is super quick and so easy to make. It is also very easy to make the macadamia nut butter. You just whiz it up in your food processor for about 1 minute! I didn't realise how much oil macadamia nuts have. So it doesn't take too long to squeeze them out.

This is a nice change from eating chocolate, peanut butter or almond fudge. And a good way to eat different types of nuts.

Macadamia Fudge Recipe


Ingredients
1 cup raw macadamia nuts
1 tablespoon coconut oil
1 teaspoon honey
1/2 teaspoon vanilla extract
sprinkle of sea salt

Method
Toss the raw macadamia nuts into a high-powered blender or food processor, and grind into a nut butter consistency. This should take about 1 minute as they contain a lot of oil. Add the rest of the ingredients, and process again until smooth and creamy.

In a container about 15cm x 9cm that has been lined with cling film pour in fudge and smooth out.

Place in the freezer to firm up then cut into pieces and enjoy. Store in fridge or it will melt.


Chocolate Coated Peanut Butter Protein Balls

Monday 4 March 2013

Chocolate Coated Peanut Butter Protein Balls


These chocolate coated peanut butter protein balls are a wonderful little pick me when you are in between meals or workout sessions. I love the light crack you hear as you bite into them. Divine.

Chocolate Coated Peanut Butter Protein Balls


Filling
½ cup natural peanut butter
2 x 30 grams scoops vanilla whey protein powder
½ teaspoon liquid stevia

In a bowl mix together peanut butter, protein powder and liquid stevia until it forms into a dough. Roll into balls and arrange on tray. Place tray in fridge for 20 minutes to let balls set.


Chocolate Coated Penaut Butter Protein Balls Recipe


Chocolate Coating
¼ cup cocoa powder
¼ cup coconut oil
Pinch of salt

In a bowl whisk together all the ingredients until smooth. Allow to set a few minutes then dip balls into chocolate and arrange on a tray. Then place in fridge to firm up. Keep stored in a container in the fridge otherwise they melt.

Marco Pierre White Tartare Sauce Recipe

Marco Pierre White Tartare Sauce Recipe

I was reading through the weekend paper when I cam across a recipe for tartare sauce from Marco Pierre White. It looked remarkably simple so decided to make it. First I needed to make some mayonnaise.

I found this deliciously simple homemade mayonnaise recipe as the base and then made the tartare sauce as per the recipe. It is thick, creamy, so fresh and tangy.

Who knew theses condiments were so easy to make. From now on they will be home made. They are too easy not to be.


Marco Pierre White Tartare Sauce Recipe

Ingredients
½ cup mayonnaise
¼ teaspoon grated lemon rind
1 teaspoon chopped capers
2 gherkins finely chopped
1 tbspn flat leaf parsley

Method
Place all ingredients in a small bowl. Season and stir well until combined. Place in small jar and store in the fridge.


Homemade Mayonnaise Recipe


Donna Hay Homemade Mayonnaise Recipe


This is a super easy recipe to make homemade mayonnaise. The taste is fresh and delicious.

I got the basic mayonnaise recipe from the Donna Hay website. It's so amazing how the egg mixture thickens up as you pour in the oil and continue to process it.

Careful it is so easy to eat with a  spoon. You will never buy store bought again. Divine. 

Homemade mayonnaise recipe

Homemade Mayonnaise Recipe

Ingredients
1 egg
1 tablespoon lemon juice
2 teaspoons Dijon mustard
1 cup olive oil
salt and pepper to taste

Method
Blend egg, lemon juice, mustard and salt and pepper until well combined. You can use a processor or a blender.

With the blender running pour the oil in very slowly in a thin stream where possible, and process until the mixture is thick and creamy.

This recipe makes about 1 1/4 cups.

Related Posts Plugin for WordPress, Blogger...

Sia's Cooking Blog Designed by Ipietoon Blogger Template